The Ultimate Guide to Vape Wires and Vape Coils
You won’t be tapping in the dark like so many other beginner builders, and your first coil will be right as rain and ready to fire.
At one point or another, a serious vaper will try a hand at building their coils – out of economic reasons, engineering prowess, or just pure fun. Coil building falls mostly within the purview of e-liquid vaporizers, as dry herb vaporizers and dab wax pens use different heating elements and do not typically get built or rebuilt by their users.
However, it is not unheard of for people to create or build and rebuild their wax atomizers for many of the same reasons we’ve just listed.
When that time comes for you, all you’ll need to do is pull up this post (because you’ve bookmarked it, right?), and you will have everything you need to start in one place: types of vape wires, countless coil builds, how to make your first vape coils, how to wick a coil, and so on.
You won’t be tapping in the dark like so many other beginner builders, and your first coil will be right as rain and ready to fire.
Ready to build right now?
Let’s dive in!
Table of Contents
- Does the Size of the Coil Matter?
- What Is the Gauge of a Wire
- Wattage and Temperature Control Vaping
- Different Types of Wires
- How to Build Vape Coils
- Coil Builds for Clouds
- Coil Builds for Flavor
- Final Thoughts About Best Coil Builds
Table of Contents
Why Vape Wire Types and Sizes Matter?
When talking about vape wire size, vapers are referring to gauge, the actual diameter of the wire. Most popular gauges that vapers use are 32, 30, 28, 26, 24, and 22 – a majority of vape coils, even the most eccentric ones and used in the best vapes, can be built with these.
The important thing to remember here is that bigger the numerical value of the gauge, the thinner the wire. 28ga is larger in diameter than 30ga but smaller than 26ga. Also, an increase in diameter will result in a decrease in resistance, which means that the wire will take longer to heat up.
That heating period is called the ramp-up time and it’s pretty important – do you want to sit on that button for ages or do you want to be able to vape as soon as you press fire? Keep in mind that exotic vape coils (i.e. the ones that use more strands of wire) will have a pretty lengthy ramp-up time, but the same will also be true for low gauge (larger diameter) wires.
Wire Gauge
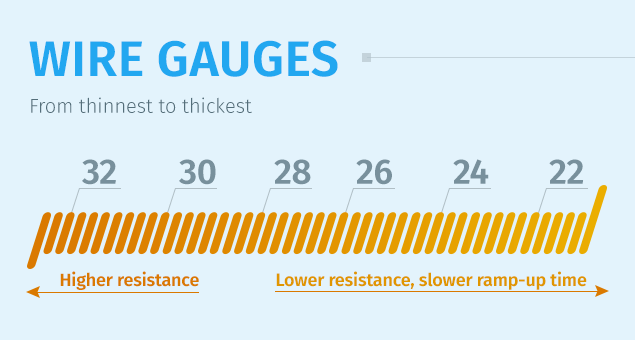
When talking about vape wire size, vapers are referring to gauge, the actual wire diameter.
- The most popular gauges that vapers use are 32, 30, 28, 26, 24, and 22 – a majority of vape coils, even the most eccentric ones and used in the best vapes, can be built with these.
- The important thing to remember here is that the bigger the numerical value of the gauge, the thinner the wire.
- 28ga is larger in diameter than 30ga but smaller than 26ga.
- Also, an increase in diameter will decrease resistance, which means that the wire will take longer to heat up.
That heating period is called the ramp-up time, and it’s pretty important – do you want to sit on that button for ages, or do you want to be able to vape as soon as you press fire? Keep in mind that exotic vape coils (i.e., the ones that use more strands of wire) will have a pretty lengthy ramp-up time, but the same will also be true for low gauge (larger diameter) wires.
Wattage and Temperature Control Vaping – Which Wires Should You Use?
You know by now that there are two different modes of vaping – the wattage mode and the temperature control mode. Of course, it would be great if we could just use any old vape wire type for both of these modes.
Unfortunately, that’s not how it goes. Here’s why: some types, like a kanthal wire, behave differently when at room temperature than when heated. For example, nickel wire can be 0.15-ohm when at room temperature, but the resistance will go way up when you fire it in your mod, and that can cause problems.
Temperature control vaping works differently than pure wattage vaping, using the Temperature Coefficient of Resistance (TCR) of a given wire to regulate the current delivered to a coil.
- To use the same example, nickel behaves predictably with regards to temperature increase – the wire will always be a certain resistance at given temperatures.
- A TC mod will use that stable increase to determine the resistance as the coil heats up, lowering the current in order to keep the coil at a safe temperature.
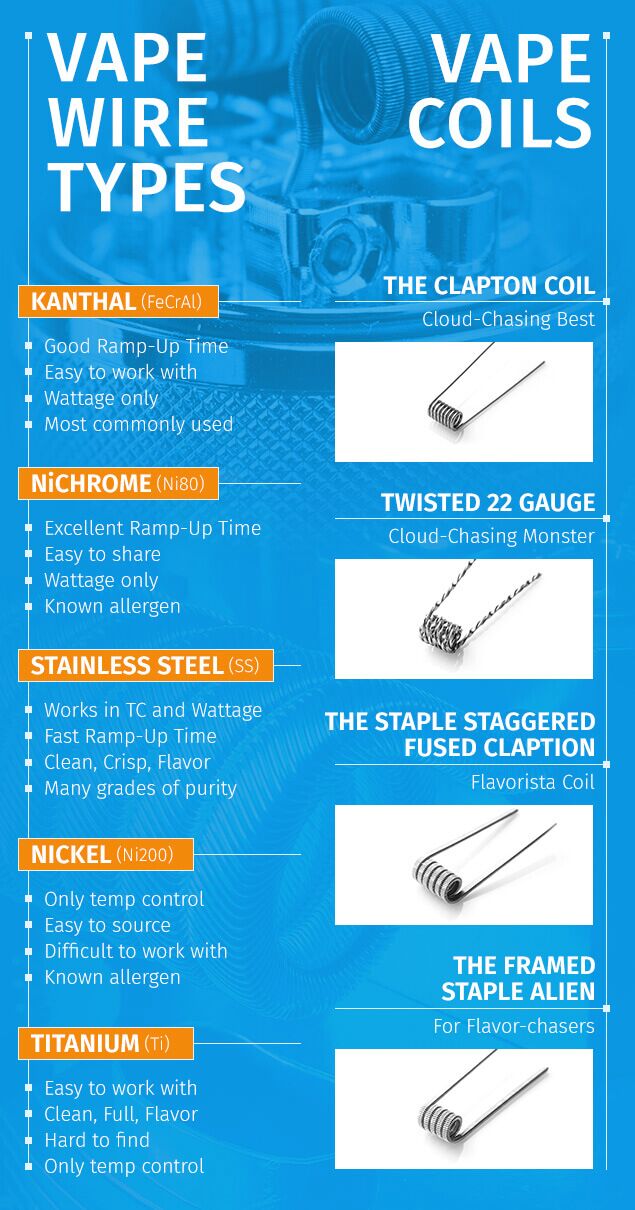
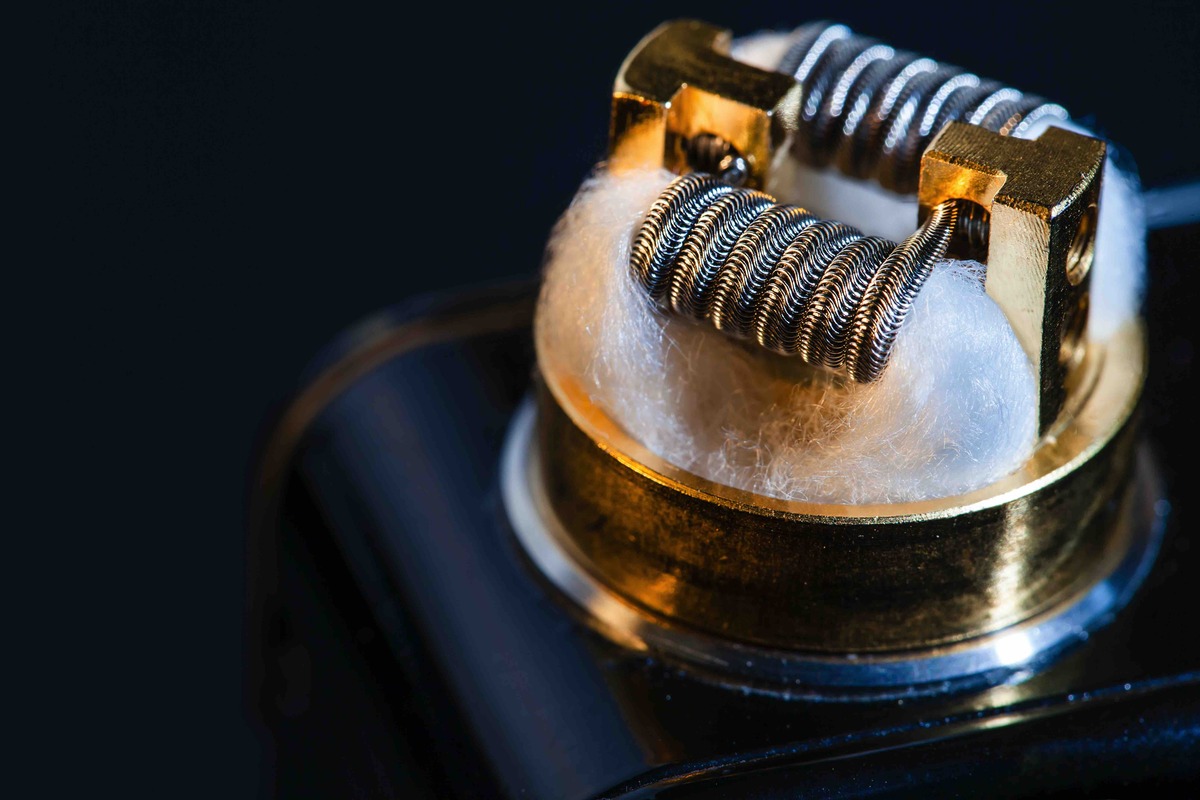
Types of Vape Wires

There are five different types of vape wires generally used:
- Kanthal Wire(FeCrAl)
- NiChrome
- Stainless Steel
- Nickel
- Titanium
As you can tell, only one vape wire is versatile enough to be used in both vaping modes, and that’s Stainless Steel. However, how do each one of these fares when it comes to flavor, cloud production, ramp-up time, and ease of use? Let’s find out.
Kanthal Wire
Kanthal wire is popular for a reason and has been for nearly a decade. It’s easy to work with, kanthal wire has good resistance to oxidation, it’s not springy so it holds shape. Also, kanthal wire is cheap and easy to find.
Kanthal wire is especially good for single coil builds, which are not extravagant but get the job done when you’re not in the mood for something fancy and time-consuming. Add to that that it holds shape well when rewicking (which means that you can use a Kanthal coil a good long time) and have a fan favorite.
Pros
- Kanthal wire is super cheap
- Easy to find in vape shops and online
- Holds shape well
- Easy to work with
- Works only in wattage mode
Cons
- Kanthal wire can’t be used with temperature control
- Some vapers find the flavor is a bit dull
- Ramp-up time not as fast as some other wires
NiChrome Wire
Another fan-favorite for wattage vaping, NiChrome, is an alloy composed of nickel and chromium. If you’re looking for fast ramp-up time, this is the wire you should look into.
Other than that, it behaves similar to Kanthal wire – it’s easy to work with (slightly less spring than Kanthal wire) and holds shape well.
One thing to keep in mind when working with NiChrome is that it has a substantially lower melting point than Kanthal wire. Excessive dry burns can cause it to catch fire – and NiChrome fire is not something you want burning under your nose. That’s why you should slowly pulse a NiChrome coil at first. Also, some people suffer from a nickel allergy and should avoid using NiChrome wire.
NiChrome is a decent vape wire that experienced vapers use with ease. It’s a bit more difficult to find in local vape shops, but most online sellers will have it in stock. One thing to note – while
NiChrome can technically be used in TC mode (and some mods boast that ability), its TCR is so low that even the most advanced chips struggle with it. So, if you can TC NiChrome with a specific mode, take that with a few grains of salt, at least for the time being.
Pros
- Fast ramp-up time
- Easy to work with
- Holds shape when rewicking
- Relatively inexpensive
- Wattage mode only
Cons
- Lower melting point than Kanthal wire (careful when dry burning)
- Contains nickel (allergen)
- Not all vape shops stock it
Stainless Steel Wire
The only vape wire that can pull double duty (work in both wattage and TC modes) is the stainless steel wire. It’s perfect for vapers that haven’t made up their mind between TC and wattage mode or fail to check the modes they’re firing in regularly.
Stainless steel wire comes in various grades (410, 413, 316, 316L, 430, 304, and so on), which adds to the confusion a bit and makes it seem as if various vapers are either singing praises or talking down the same type of wire.
Some grades of SS wire contain almost no nickel (SS is an alloy composed of various parts of chromium, nickel, and carbon), which is definitely a pro for people with nickel allergy.
Other positives include the fact that it can be easily dry burned (thanks to its high melting point), it’s relatively easy to work with, and it holds shape well.
That said, some SS wire grades are more springy than others. SS 304, 430, and 316 grades are usually recommended, as they do TC very well, despite the fact that they have a relatively low TCR (temp/resistance change that can make it harder for mods to regulate).
Stainless steel offers a faster ramp-up time, similar to that of Kanthal wire, and it produces a crisp and clean flavor (which, as always, is subjective). One of the bigger downsides of certain SS grades is that they are not readily available in usable gauges.
Pros
- Easy to work with
- Holds shape
- Fast ramp-up time
- Cleaner flavor
- Relatively inexpensive
- TC and wattage compatible
Cons
- Usable gauges difficult to find for some SS grades
- Higher nickel content in certain grades
- Some grades a bit more difficult to work with than others
Nickel Wire
Nickel, also referred to as Ni200 (pure nickel), is the first wire used for temperature control. It has a TCR of 0.006, making it fairly easy for most chips to read and regulate. Ni200 should only ever be used in TC mode because of concerns of overheating and melting.
Namely, nickel wire can leach and, at high temperatures (above 600F), can produce graphite, which is why some vapers are concerned about getting graphite lungs (a debilitating condition sometimes seen in people overexposed to graphite, usually pencil factory workers).
That said, most of the bad rep the nickel wire is getting is blown out of proportion. When used in TC vaping, nickel is a perfectly safe wire. Its biggest downsides are that it’s rather soft, so it’s difficult to work with, and that it doesn’t hold shape all that well. Also, people who have a nickel allergy should avoid it.
On the plus side, nickel is relatively easy to find locally, and it’s inexpensive. Its ramp-up time is faster than that of Kanthal wire, and, these days, it’s easy to find tempered nickel wire, which is a lot easier to work with (similar to Kanthal A1) and holds shape well.
One thing to keep in mind is that some people actually have a nickel allergy and can react to their coils. If you see any symptoms like a rash or irritated eyes or throat, then you may be allergic to your nickel coil. This is very rare, just something to be aware of.
Pros
- Fast ramp-up time
- Fast ramp-up time
- Easy to find
- Inexpensive
- Decent flavor
Cons
- Nickel content
- Soft to hard to work with
- Doesn’t hold shape
Titanium Wire
The most controversial vape wire on this list is definitely the titanium wire. It’s a scary one because it does, in fact, release titanium dioxide (which is toxic) when heated over 1130F.
However, it has a stable TCR and if you have a functioning TC mod, titanium dioxide poisoning is not something you should ever be concerned about. One piece of advice that’s often imparted about using Ti wire is to heat it until it’s shiny and has a thin oxide layer that simply sticks to the wire.
Most vapers using these vape wires report no problems while using them, so the panic surrounding them is definitely blown out of proportion. Titanium oxide is found in many everyday items like makeup and even some foods.
It may or may not be hazardous when inhaled according to the research of titanium dioxide in daily life, but the evidence doesn’t seem to indicate that any in gas form when vaping should cause a considerable problem.
Now that we’ve alleviated your fears, it’s time to move on to Ti wire pros. Titanium is very easy to work with, holds shape really well, and works exquisitely in TC mode. Also, most vapers using it note that it produces great flavor. Another upside to Ti wire is that it’s a lot stronger than Ni200, allowing you to use it longer without breaking or bending out of shape.
Pros
- Easy to work with
- Holds shape well
- Stronger than Ni200
- The clean, crisp flavor
- Works great in TC mode
Cons
- Can’t be used in wattage
- Toxicity concerns
- Titanium fires difficult to extinguish
- Hard to find
What is the Micro and Macro coil building?
There are two of the most popular types of coil builds: micro and macro coils. The main feature that differs them is the inner diameter of the coil.
- The micro coil build has an inner diameter of 1 to 2 mm.
- The macro coil build has an inner diameter that’s 2.5 mm and above.
The inner diameter of the vape coil influences its resistance. The bigger the diameter the higher the resistance, the thicker the wire gauge, the lower the resistance.
How to Build a Simple Vape Coil
The Internet is full of great video tutorials that show, step-by-step, how to build your own vape coils, especially the simple ones made out of one strand of wire. Still, for clarity’s sake, let’s briefly touch upon what you’re going to need for coil building and how the process looks like.
Before doing any build of your own, it is very important to get at least a basic understanding of Ohm’s Law. Building your own coil incorrectly can lead to injury, so study this principle until you understand it.
What you will need to build vape coils:
- An ohms reader
- A coil maker (specialized tool for building vape coils) or a small screwdriver (2 mm)
- Vape wire
- A small screwdriver or an Allen key that fits the screws of your RDA
- A lighter or a propane/butane torch
- Nail clippers or wire cutters
- Tweezers (ceramic tip)
- Now you’re ready to build!
Before you start, it’s always a good idea to check just how many wraps your vape coil will need until you reach your target resistance.
A coil wrapping calculator is great for that. In this particular case, to get a 1-ohm resistance from a single SS 316 coil with a 2 mm diameter, we will need eight full wraps.
- Ahead of coiling, make sure to oxidize your wire (heat it with a lighter or a torch until it glows) to make it less springy and easier to work with.
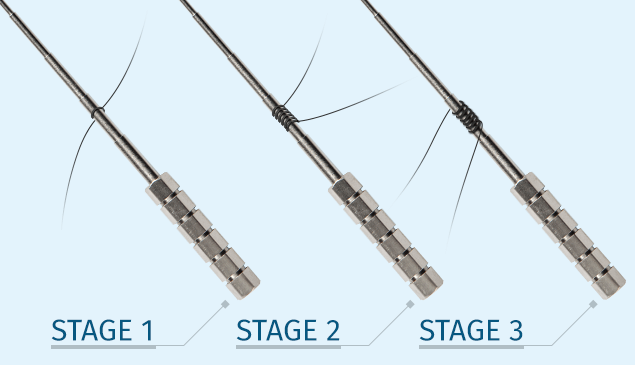
- Wrapping the coil – cut 4 – 5 inches of wire and use your screwdriver to make wraps. Start near the shaft of the screwdriver so you can hold the wire in place with your thumb.
- Continue wrapping it around the screwdriver, making sure that your wraps are as close to one another without overlapping.
- Once you’ve reached 8 full wraps (the ends of the wire should face in the same direction), leave the coil on the screwdriver and proceed to the next step.
- Note that using a coil wrapping tool usually results in nicer-looking coils and is faster, at least if you’re a beginner.
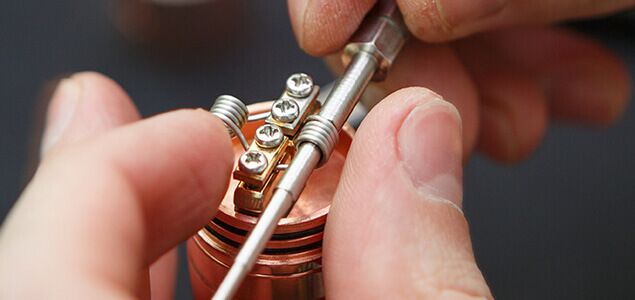
- While installing – unscrew the posts on your RDA carefully (not all the way out so you don’t lose them) and use the screwdriver to carefully position the ends of the coils into the post holes (one positive and one negative).
- Make sure that your coil is positioned at the center of your RDA deck. Now, tighten the post screws gently.
- Remove the screwdriver and trim the protruding legs as close to the posts as you can (nail clippers work like a charm here).
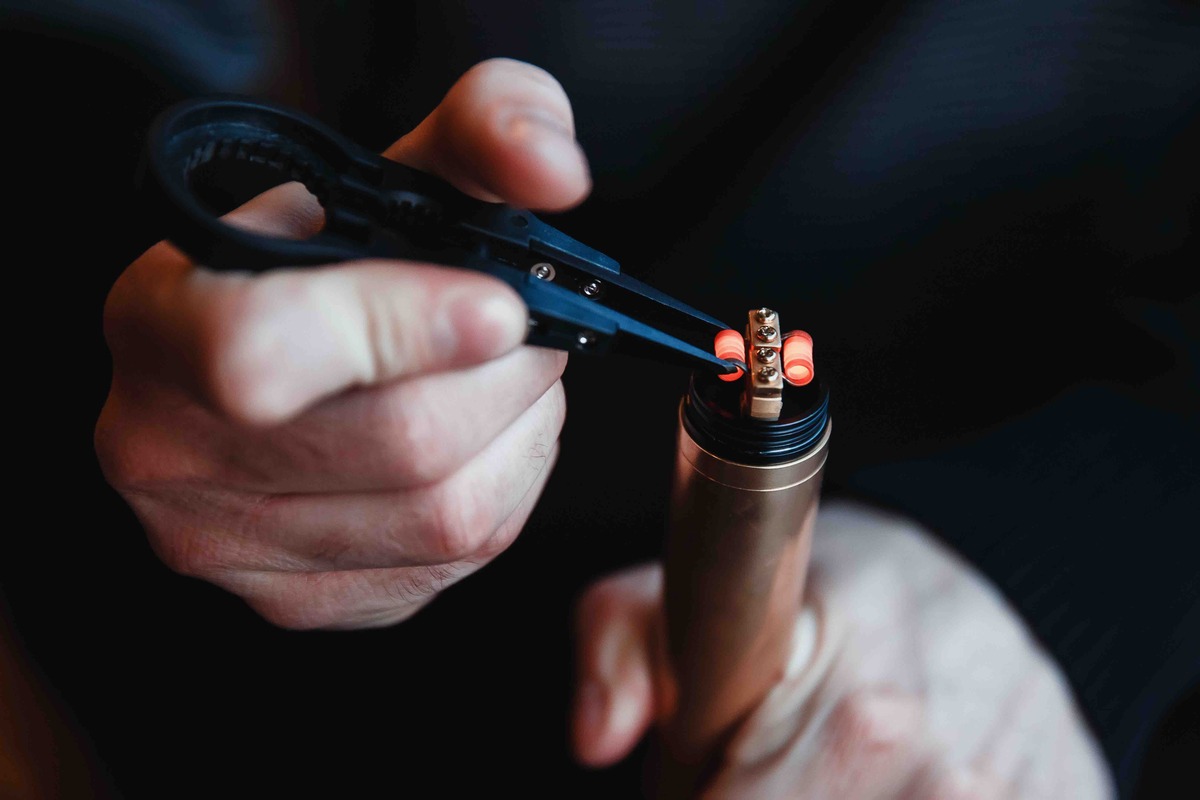
Test firing the coil – now that it is installed, it’s time to test fire it. Before you do that, make sure to check the resistance with your ohms reader. Simply screw your RDA onto it and it will display the firing resistance of the coil.
Don’t be alarmed if the reading is off by 0.1-ohm up or down – that happens often. However, if the discrepancy is not within that range, check to see if the post screws are tight and if the coil is touching the posts or the deck. Adjusting those two things a bit will usually solve the problem.
After that, attach your RDA to a mod and briefly fire it until it glows. What you want to see is even heating, starting from the center of the coil and moving to the ends – you don’t want any hotspots that might cause the coil to snap in two. Use your tweezers to gently pinch the coil together and repeat until it heats evenly.
You’ve now successfully built a single, 1-ohm coil – congrats! However, this is just the beginning. While most vapers are happy with single coil builds, it’s important to note that there are many RDA coil types, ranging from simple to extravagant.
For some of them, you will have to use several strands of different wires, as well as multiple tools, including even an electric drill. But – baby steps first! For a recap on how to build simple vape coils, check the video tutorial below.
The Internet is full of great video tutorials that show, step-by-step, how to build your own vape coils, especially the simple ones made out of one strand of wire. Still, for clarity’s sake, let’s briefly touch upon what you’re going to need for coil building and how the process looks like.
Before doing any build of your own, it is very important to get at least a basic understanding of Ohm’s Law. Building your own coil incorrectly can lead to injury, so study this principle until you understand it.
What you will need to build vape coils:
- An ohms reader
- A coil maker (specialized tool for building vape coils) or a small screwdriver (2 mm)
- Vape wire
- A small screwdriver or an Allen key that fits the screws of your RDA
- A lighter or a propane/butane torch
- Nail clippers or wire cutters
- Tweezers (ceramic tip)
- Now you’re ready to build!
Before you start, it’s always a good idea to check just how many wraps your vape coil will need until you reach your target resistance.
A coil wrapping calculator is great for that. In this particular case, to get a 1-ohm resistance from a single SS 316 coil with a 2 mm diameter, we will need eight full wraps.
- Ahead of coiling, make sure to oxidize your wire (heat it with a lighter or a torch until it glows) to make it less springy and easier to work with.
- Wrapping the coil – cut 4 – 5 inches of wire and use your screwdriver to make wraps. Start near the shaft of the screwdriver so you can hold the wire in place with your thumb.
- Continue wrapping it around the screwdriver, making sure that your wraps are as close to one another without overlapping.
- Once you’ve reached 8 full wraps (the ends of the wire should face in the same direction), leave the coil on the screwdriver and proceed to the next step.
- Note that using a coil wrapping tool usually results in nicer-looking coils and is faster, at least if you’re a beginner.
- While installing – unscrew the posts on your RDA carefully (not all the way out so you don’t lose them) and use the screwdriver to carefully position the ends of the coils into the post holes (one positive and one negative).
- Make sure that your coil is positioned at the center of your RDA deck. Now, tighten the post screws gently.
- Remove the screwdriver and trim the protruding legs as close to the posts as you can (nail clippers work like a charm here).
Test firing the coil – now that it is installed, it’s time to test fire it. Before you do that, make sure to check the resistance with your ohms reader. Simply screw your RDA onto it and it will display the firing resistance of the coil.
Don’t be alarmed if the reading is off by 0.1-ohm up or down – that happens often. However, if the discrepancy is not within that range, check to see if the post screws are tight and if the coil is touching the posts or the deck. Adjusting those two things a bit will usually solve the problem.
After that, attach your RDA to a mod and briefly fire it until it glows. What you want to see is even heating, starting from the center of the coil and moving to the ends – you don’t want any hotspots that might cause the coil to snap in two. Use your tweezers to gently pinch the coil together and repeat until it heats evenly.
You’ve now successfully built a single, 1-ohm coil – congrats! However, this is just the beginning. While most vapers are happy with single coil builds, it’s important to note that there are many RDA coil types, ranging from simple to extravagant.
For some of them, you will have to use several strands of different wires, as well as multiple tools, including even an electric drill. But – baby steps first! For a recap on how to build simple vape coils, check the video tutorial below.
How to Wick a Vape Coil
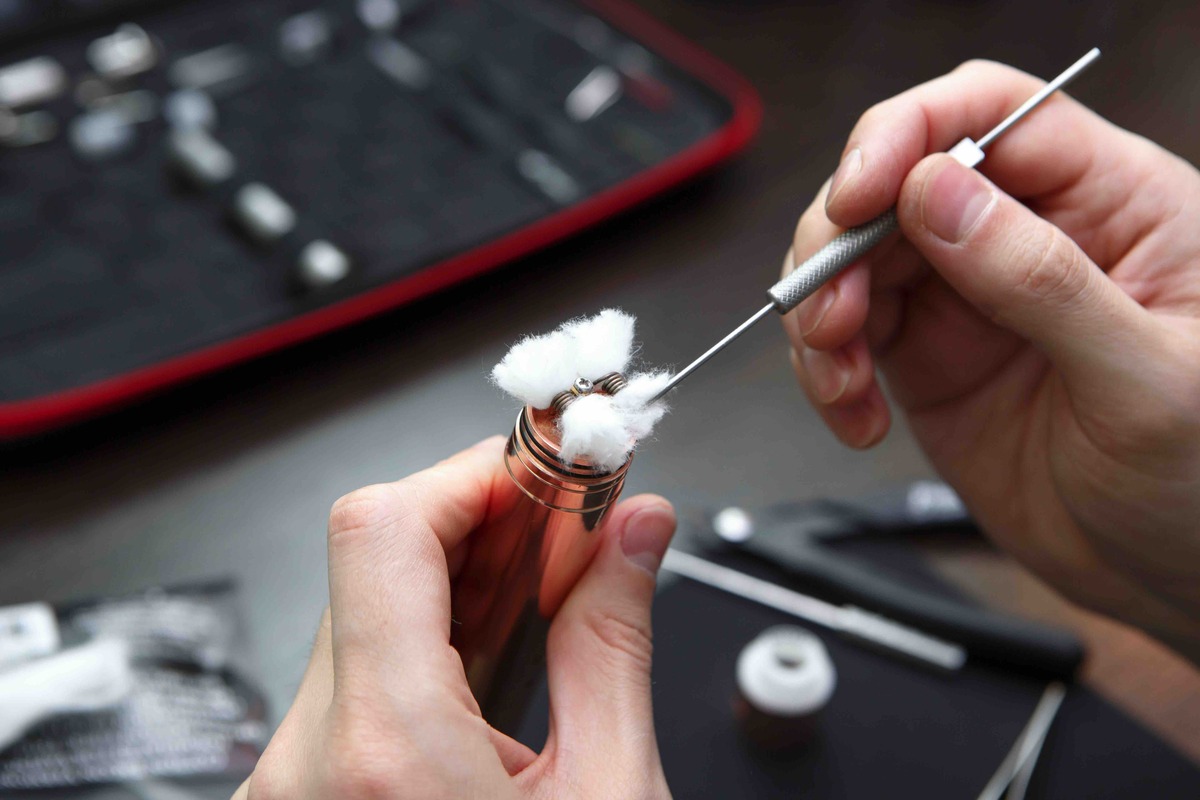
Once your vape coil is done, it’s time to wick it. Beginner builders can have a problem with this, which is a real shame since, without proper wicking, all that effort that went into building a coil is wasted.
First thing’s first – you will have to choose a wicking material. There are many options out there to work with, so choose the one you’re most comfortable with:
- Organic cotton
- Japanese cotton pads (Koh Gen Do)
- Ekowool
- Silica
- Rayon fiber
Now, an answer to how to wick a vape coil is simple – with patience and a bit of practice. For best results, follow the next few steps (we’re assuming you’re using cotton as it’s the most popular vape coil wicking material right now). Make sure to watch the video as well, as it demonstrates four different styles of vape wicking that might come in handy one day.
- Stretch the cotton into a rope-like shape – take a ball of cotton and pull on it until you have what is, effectively, a small cotton rope. Make sure that it’s at least several inches in length since you can easily cut off the excess.
- Thread the cotton into the coil – pinch one end of the cotton and thread it carefully through the coil installed to your RDA. This is a fine art – the cotton thickness should be just enough to go through with a slight pull, but not so thick to bend the coil out of shape. Also, if there’s no resistance, your cotton is not thick enough and will not wick properly, resulting in a lot of dry hits.
- Cut the ends of the cotton – make sure that you leave enough to fill the juice well of your RDA. Different RDAs will require a different fill so you will need to experiment with this.
- Tuck the cotton under your coil – use small pliers or scissors (or even a toothpick) to tuck the ends of your cotton vape wick underneath the coil. Make sure that the ends are touching and that the cotton is not sticking out of the juice well.
That’s that – now you can add a bit of vape juice to your dripper coil and vape away.
Vape Coil Wicking video:
How to Wick a Vape Coil
Once your vape coil is done, it’s time to wick it. Beginner builders can have a problem with this, which is a real shame since, without proper wicking, all that effort that went into building a coil is wasted.
First thing’s first – you will have to choose a wicking material. There are many options out there to work with, so choose the one you’re most comfortable with:
- Organic cotton
- Japanese cotton pads (Koh Gen Do)
- Ekowool
- Silica
- Rayon fiber
Now, an answer to how to wick a vape coil is simple – with patience and a bit of practice. For best results, follow the next few steps (we’re assuming you’re using cotton as it’s the most popular vape coil wicking material right now). Make sure to watch the video as well, as it demonstrates four different styles of vape wicking that might come in handy one day.
- Stretch the cotton into a rope-like shape – take a ball of cotton and pull on it until you have what is, effectively, a small cotton rope. Make sure that it’s at least several inches in length since you can easily cut off the excess.
- Thread the cotton into the coil – pinch one end of the cotton and thread it carefully through the coil installed to your RDA. This is a fine art – the cotton thickness should be just enough to go through with a slight pull, but not so thick to bend the coil out of shape. Also, if there’s no resistance, your cotton is not thick enough and will not wick properly, resulting in a lot of dry hits.
- Cut the ends of the cotton – make sure that you leave enough to fill the juice well of your RDA. Different RDAs will require a different fill so you will need to experiment with this.
- Tuck the cotton under your coil – use small pliers or scissors (or even a toothpick) to tuck the ends of your cotton vape wick underneath the coil. Make sure that the ends are touching and that the cotton is not sticking out of the juice well.
That’s that – now you can add a bit of vape juice to your dripper coil and vape away.
Vape Coil Wicking video:
Best Coil Builds for Clouds
If you’re looking to blow huge clouds, a good understanding of vape coils will help you tremendously. There are several things that you need to take into consideration if you want to compete as a cloud-chaser:
- Airflow – excellent airflow is essential for big clouds. Make sure you don’t overstuff your coil with cotton because you will choke it.
- Wire gauge – lower the gauge, thicker the wire – more surface area that vaporizes the juice. 24 gauge wire is way better for cloud-chasing than 30 gauge but will need a lot more wraps to get it to low resistance.
- Inner diameter – 2 mm inner diameter builds won’t cut it for big clouds and you will need to go to at least 3 mm. A bigger inner diameter provides more cotton-to-wire contact and helps vaporize vape juice quicker.
- Coil positioning – you want your coils to align with your center pin post so that wicking on each side is even and can absorb vape juice quickly.
Best Vape Coils for Clouds:

Here are our three favorite coils designed for cloud-chasing:
- Dual Coil 24 Gauge
- 22 Gauge Macro Coil
- The Clapton Coil
Best Vape Coils for Clouds:
Here are our three favorite coils designed for cloud-chasing:
- Dual Coil 24 Gauge
- 22 Gauge Macro Coil
- The Clapton Coil
Best Coil Builds for Flavor
If you’re not into big clouds, then you’re probably a flavorista. That’s perfectly fine – there are some awesome coil builds aimed exclusively at maximizing the flavor output. You will need to keep a few things in mind, though:
- Airflow – usually, less air means more flavor because the air gets more easily saturated with flavor particles. Pack your juice well with cotton a bit more than you normally would for a cloud-chasing coil.
- Wick positioning – minimizing airflow is all well, but you need to make sure there’s enough room under the coil for air to circulate. Make sure to leave a small hole in there so that the air can easily pick up flavor particles.
- Wire type – this one is very subjective, but most flavor-chasers suggest using Ni80 or Stainless Steel 316L for great flavor.
- Wick type – again, subjective and will depend on the wattage you’re vaping on, but vapers have been seeing great flavor results with Japanese cotton wicks.
3 Best Vape Coils for Flavor
It bears repeating that flavor is really something that’s very subjective. What tastes great to someone might taste stale or overpowering to another vaper.
With that in mind, we proceeded to choose three top coils for flavors based on forum feedback from a number of vapers. Word of warning – all of these coils are difficult to make so don’t get discouraged if it takes a few tries.
- The Framed Staple Alien Coil
- The Staple Staggered Fused Clapton Coil
- The Tri-Core Fused Alien Clapton Coil
Crazy Coil Builds
You probably thought those flavor coils were difficult to build but wait until you see what we have in store for you here. These crazy coil builds will make you work your fingers until they’re bloody and raw. Sure, they look beautiful, but are they really worth the hassle? Judge for yourself.
The Dragon Skin Coil
The Juggernaut Coil
Tidal Wire Coil
Flat Bastard Coil
The Dual Twisted Clapton Helix Coil
Vape Wires and Vape Coils In a Nutshell
As you can see, finding your vape nirvana can be a challenging endeavor. With so many vape wires, gauges, and coil types out there, it can take quite some time to stumble on a setup that perfectly fits your vaping style. Still, it’s a fun process and, if you have the time, we’re sure you’ll enjoy exploring different flavor nuances that come with every new coil.
If you have any questions about vape wires or vape coils, make sure to leave a comment below. And, if you decide to try your hand at building any of the crazy coils we’ve featured here, give us a shout – we’d love to see the end result.

Darion
April 29, 2022 at 1:26 pmI have a buddha z v2 rda and a regulated mod. I like to vape between 100-200watts. What’s the best coils I could use for that?
Sakthy
August 27, 2020 at 5:10 amHello, I noticed on YouTube that some coils are made with different awg wires fuse / wrapped together then coils for the device. What is the purpose of using a mixture of Kanthal, SS, Ni wires and of various thickness to make up one core / strand which can then be coiled? Aas I am totally new to all this, I am somewhat confused with this concept. Is is absolutely necessary or can we just use for example a few strands of SS 316 to fuse together?
Thank you.
Warm Regards,
SK.
James Bickford
September 3, 2020 at 10:41 amHi Sakthy, thanks for writing in. I’m not sure which videos you watched on YouTube, but people often post videos of their one-of-a-kind builds that fuse together different materials. Even though it is possible, that kind of coil building is more for experts and not necessarily in the realm of beginners like you. You could absolutely fuse strands of stainless steel 316 or even buy pre-wrapped, pre-made stainless steel coils to use in your atomizer. Of course, you can buy different wires with different gauges (thickness) so you don’t have to fuse together individual strands of wire. Hope this helps. Let us know if there’s anything else we can help you with. Happy Vaping!
Sakthy
August 27, 2020 at 5:07 amHello, I noticed on YouTube that some coils are made with different awg wires fuse / wrapped together then coils for the device. What is the purpose of using a mixture of Kanthal, SS, Ni wires and of various thickness to make up one core / strand which can then be coiled? I am somewhat confused as to this concept. Is is absolutely necessary or can we just use for example a few strands of SS 316 to fuse together?
Thank you.
Warm Regards,
SK.
navid
April 26, 2020 at 2:33 amexcellent.
Rudy
December 28, 2019 at 10:02 amHi, i just buy Master of Cloud SS 316L 28Ga. And i have Zeus X RTA and planning to have dual coils build. Please help me, how much wraps i have to do for each coils? Sorry if my language is sucks, this is not my native language..
Robert
December 24, 2019 at 2:53 amI’m new to vaping and looking to buy my first dry herb vape and there are just so many options and want to get peoples’ personal on which to buy. I want 200 to be my limit but I would be willing to give just a little more if it was worth it. I have looked at the Boundless vapes that look good but I’ve also seen the G pen, Exxus vapes, PAX 2, Alfa and was wondering which would you guys really recommend. Stealth isn’t the biggest thing for me put I’d like to be able to easily hide my vape. I’m also just kind of looking for the vape that is the best bang for my buck and that is easy to use. I’d love to hear everyone’s opinion. Thanks guys!
Jeff c
February 23, 2019 at 2:16 pmSuperb info my friend im jumping from a t22e with t18 prism tank which is fab to a coolfire 4 and ares rta mtl for first time tomorrow could you advise on best coil size etc and also the best wicking used. Thanks its the euro version smaller glass height does that make difference to pull if you know what i mean sook. It was a review i seen a man slated the designer ares tank due to the amount of air holes on deck and the way are is drawn for a real mtl is to avoid this. Also cw4 only goes to 40w if you ran that across 1ohm coil what happens ? What are the dos and donts. I know you should start from low watts and increase but would the metal break coil snap?
Luke
October 19, 2018 at 8:36 amI notice I can buy ni 80 in 100 ft for around $10 and for $25 is there a significant difference in quality between the 2?
Martin jindani
September 25, 2018 at 2:25 amWhat guage is safe for variable mod
Rami Marciano
September 5, 2018 at 1:34 pmi have the tarot nano and going to pair it with RTA Gemini of vaporesso,for coil will use clapton 24 or 26 ga, my question, do i need to test resistance and dpurchase oem meter or no need since i will be using the wire type recommended by vaporesso? many thanks for any advise.
Hesham Morsy
August 31, 2018 at 9:52 amThank you very much for the useful informations I found here, I am not a fan of building my own coils, I prefer pre_made coils. My question for you is what best coils to buy, I am using serpent ssm and Pharaoh mini with mini sx g class mod and also Snowwolf Mfeng mod… Thanks
steveo
August 3, 2018 at 9:37 pmThis article is very helpful IM NEW to vaping i started a month ago I quit smoking started out with smok prince stick, kept going through coils daily so decided to ijoy pd270 genie and a vandy vape tripple v2.. works great been playin with demon coils pack like 10 differnt types an 6 of each. Well ive only ran 2 coils at the most question is will i get better flavor with 2 coils versus 1 an whata best coil for flavor
Jack.
July 30, 2018 at 5:01 amThank you for a great presentation and taking the time to research and explain your knowledge base.
James Alton
July 21, 2018 at 9:35 amI have a geekvape Athena single imr 18650 and need to know what my coil resistance range is . so I can make my own coils. appreciate your advice
Simon
July 18, 2018 at 4:43 pmIn addition to the comments above, you mention “you’ll need more wraps to reach a low resistance”, more wraps increases the amount of wire and increases resistance.
With a thicker wire, more wraps are needed to raise the resistance to a manageable level.
chris
July 6, 2018 at 7:13 amGreat, helpful post – thank you
Joshua
July 1, 2018 at 6:45 amHow then does one build coils for the tank style as opposed to the drip style shown here?
Quintin Traut
May 24, 2018 at 3:19 amThat Is correct!!!
Smallest to biggest 30 – 28 – 26 ect……..
This is an awesome article though
I already knew most of what was said in the article but for beginners this is an awesome read and it dies get quite technical
To all you vapers and builders out there take it easy and enjoy
Eric
May 8, 2018 at 6:28 am“The important thing to remember here is that bigger the numerical value of the gauge, the thinner the wire. 28 gauge wire is smaller in diameter than 30 gauge wire, but bigger than 26”
This part makes no sense. if the higher no. is smaller wire, then how can 28 be smaller than 30 and bigger than 26?
Eric
May 8, 2018 at 6:29 amthe correct order from smallest to biggest is 30 – 28 – 26.
Correct?
Robbie Saylor
April 29, 2018 at 3:37 pmHello, doesn’t this statement contradict itself? Lol…
The important thing to remember here is that bigger the numerical value of the gauge, the thinner the wire. 28 gauge wire is smaller in diameter than 30 gauge wire, but bigger than 26.
Wouldn’t 28 ga be larger than 30 but smaller than 26?